


One of the questions I am frequently asked is "How do you make your maps?" After
seeing the maps I've done, both for my website, and my big City of Greyhawk
poster map published by Wizards of the Coast for the Living Greyhawk Journal,
many people assume I must use a mapping program, and then promptly would ask, back in the day, "Which
mapping program do I use? Surely you must use CC2?" This is when CC2 was one of the only mapping programs out there. The short answer is that
I do not use a mapping program. All my maps are crafted using a variety of techniques,
and using mainly two programs/suites... Adobe Photoshop, and CorelDraw. There
are a few other programs that I have used on occasion (certainly a scanning
program or two) for specialized situations. An example of that was the use of
Adobe Illustrator for the map tags (text) on the original City of Greyhawk map
file that went to the publishers. This was done for reasons involving the printing
process, and while it could be used for personal mapping, it is not really necessary.
Essentially, all the maps (and all other graphics such as the logo, buttons,
and backgrounds) you see on my website were created using Photoshop, CorelDraw,
and Photopaint (which comes with CorelDraw). Each of these programs do different
things, so differently styled maps rely more on one or the other.
The original version of this webpage was created quite a while ago, and both the technology and the needs of DMs have evolved some, so it is time for an update! I'll try to focus more on design, rather then the programs used, as the latter topic is a constantly moving target.
So how do you create a map? It depends on what type of map you want. Maps can be divided into three basic groups:
Dungeon or building scale
Local scale (such as city maps)
Regional scale (countries or continents)
I'll concentrate primarily on the second of those groups for a variety of reasons, but will briefly mention the other two as well. Local scale maps are perhaps the most demanding, because they contain the elements of both dungeon-scale and regional-scale maps. Dungeon-scale maps are often simple enough that DM's can do just fine with handdrawn maps. What has changed in recent years is the increasing use of online playing aids such as Roll20 and Fantasy Grounds. I've personally not done much in the way of battlemap-type maps, so I'll urge you to look to the many other sources of tips for those types of maps. Many DMs find that published products (campaign world maps and supplements) cover most of their needs at the regional scale. And while most of a campaign world (at the country scale) will be covered in available published products, local-scale maps, the maps you actually use often in a gaming session, are sorely lacking for all the published worlds. City maps in particular are in short supply, generate the most interest in RPG mapmaking, and thus will be the major topic of this webpage.
You can't find a more powerful and versatile program than Photoshop. Most of the maps you'll see on my Guide (and throughout my website) were either created using Photoshop, or had some finishing work done in Photoshop. However, the big problem is its very steep price. Not everyone has access to it. I am fortunate enough to have it through my work. But, frankly, not everybody needs the power that comes with that high price. Not everyone needs to, or wants to, create publication-quality maps.
If all you want to do is make maps for your personal campaign, Photoshop Elements (basically "Photoshop Light") will serve perfectly well. You can pick up the newest version of Elements for $99 straight from Adobe.com or Costco, and maybe even cheaper if you can find it on sale at your local software distributor.
Nor do you really need the new-fangled uber-functionality of the newest version of either Photoshop or Photoshop Elements. I've seen old versions of full Photoshop on sale for the price of the newer versions of Elements... and if you can find an old version of Elements, it should be even cheaper. I used an old Photoshop 5.0 for years on one of my older work machines that would choke on Photoshop CS2... never mind the newest versions. The one problem is if you are running newer operating systems that may not be very friendly to older programs. Windows7 is friendlier to legacy programs although I haven't tried running older versions of Photoshop on it. According to the Microsoft Windows compatibility tables, Vista can run Photoshop CS3 or newer, and Photoshop Elements v.5 and v.7, while Windows7 runs those plus Photoshop Elements v.8 and the much older (and theoretically cheaper) Photoshop v.7. As well, the newest versions of Photoshop have unfortunately gone to a monthly subscription model. I still run the last version of non-subscription Photoshop.
Lastly, when I bought my digital camera years back (Nikon), it came with a free copy of an older version of Photoshop Elements. Free is the best! Ok, well... the digital camera cost me a heck of a lot of money. But if you are in the market for a camera already, it pays to check out the extra software that comes with it. There are so many cameras on the market, why not use that as a way to help thin out the field.
There is a bit of a learning curve with Photoshop (and Elements), but its worth it. Finding an older copy of Elements may be worth the minor expense, as it is a program that is far more versatile than any of the dedicated mapping programs. Besides, CC3 is not gonna turn you into a mapping god and fix the red-eye in your family photos, smooth away the wrinkles on mom, and remove the pimple from your wedding photo. Extra functionality is a bonus selling point when it comes to convincing your significant other that you really do need that program.
 |
 |
| The base map for a layered PDF described below, created within Photoshop | A sketch map of an underdark location scanned and edited in Photoshop using an "old-school" 1st Edition style |
If the Photoshop family of programs is still beyond your means, then it is well worth trying GIMP, as a free graphics-editing program. The folks over at the Cartographers' Guild are big proponents of GIMP, and you can find many great tutorials there on how to use it. As rastor-editors, the principals behind using Photoshop and GIMP are essentially the same, so you can apply many of those tutorials to both programs.
|
|
| Dungeon-scale map of Brindec, made with CorelDraw |
 |
| Dungeon-scale map of Maldin and Elenderi's
shop, created with Photoshop |
For dungeon-scale maps, I usually use CorelDraw, which is a vector-based drawing program, and like Photoshop, is quite expensive. Dungeon- and building-scale maps tend to be almost completely angular in a way that outdoor topography never is, so you want a program that draws clean lines, not free-hand lines. An example of this sort of work would be my Brindec map on the Dreadwood page of this website, and the interior maps for Melkotia Castle. I have, however, also created dungeon-scale maps using only Photoshop, such as the floor plan for Maldin's shop in the City of Greyhawk. As a vector-editing graphics program, Adobe Illustrator can produce work similar to that produced by CorelDraw, although the two programs do have different functionalities.
CorelDraw is very powerful, and you can accomplish amazing things with it, but it does have a steep learning curve. There are several dungeon-mapping programs out there, and some of them are capable of producing quite adequate maps, as the artistic demands of this sort of map is not very high. So if you can't afford CorelDraw, or don't wish to tackle its complexity, I heartily recommend any of a number of those better programs. I've seen some fairly reasonable work of this type done with Dungeon Designer2 (ProFantasy) and Dundjinni. AutoRealm maps, or at least the ones I've seen, are just too simplistic or mechanical for my tastes, although it might be possible to produce something reasonable from it. Much of the advise regarding things like layers that I'll describe below apply here as well. As a side note, if you are looking for great (and real!) tomb maps, check out the Theban Mapping Project. Its quite an amazing site. I love the 3D Tomb Tour! If you're of the mind that any map that you don't have to draw by hand is a good map, and you don't wish to have any flexibility whatsoever, then try out one of the several tile-based mappers.
A vector editor like CorelDraw can be used for regional-scale maps, but unless you are willing to put huge amounts of time into microscopic line-shaping and editing (and unless you are a pro at it), the results will be less then satisfying. This is partly why the available mapping programs do not produce good regional maps - they are, at their heart, vector-based (and very simple at that) CAD-type programs. If thats the look you're going for, that's fine. I've used CorelDraw for very simple (and fast) location maps, such as my Yatils and Melkot location maps, but the result is rather utilitarian and not very spectacular. After you have created the grid (which you can then use over and over again on other maps), the "paintbucket" function of most drawing programs produces a Darlene-quality map in mere seconds. Create a hill or mountain, and "clone" it a bunch of times, and voila... you have a nice, simple location map.
Because of their simplicity, CorelDraw is also a great program for creating
schematic maps of all types. Wilderness maps and large scale underground maps,
such as this map of
the tunnels and caverns of the D-series of modules are relatively
easy to draw and label. The result can look quite professional with a minimum
of effort.
 |
 |
| A regional-scale map, made with CorelDraw | A regional-scale schematic map of the tunnel complexes beneath Greyhawk's Hellfurnaces based on the classic D-Series of adventures, done with CorelDraw |
Of the geographic mapping programs available, CC3 (ProFantasy) and Fractal Mapper (NBOS) used to produce overly simplistic (and annoyingly mechanical) maps that don't usually have any sort of "organic" feel to them, but have continued to add features as they evolve and certainly do better now. If you are ok with their output, then give them a try. Their pricepoints are certainly more reachable than the professional graphics suites. Their advantage is that they come with objects (trees and mountains) to simplify your simple mapping. NBOS also produces Fractal World Explorer, which "generates" topographic world maps. It produces beautiful-looking continent maps, yet basic flaws in the program's design limit all possible output to geographically and geologically unbelievable worlds. You may not care about that, in which case you'll love the program, but if you have the feeling that "something looks wrong" about the output, and that they "all look alike", that is the reason why. I've not seen an acceptable regional map done with Dundjinni, however over the years they have improved the program's output geared for battlemap-type products, and there is a real demand now-a-days for that sort of output for use in online playing sites such as Roll20 and Fantasy Grounds. AutoRealm is another mapper more geared for regional maps that has also improved over the years. Inkarnate is a newer regional mapper, that is object based, much as CC3 is an object-based local mapper. As a result, Inkarnate maps tend to have an identical "feel" which can look very good, however mappers can fall into a "short-cut" trap that will produce less creative results. With thought and planning, it can produce well-designed maps. Unless all you're going for is a simple hex-based "paintbucket-type" location map as described above, there is no excuse whatsoever to use any sort of tile-based mapper to produce a regional or city map. Sorry. Quality design is, by definition, impossible with such a technique as far as I'm concerned.
 |
| A geographic-scale map, created with a
Bryce base map, then modified and labelled within Photoshop |
For the fearless mapper out there, the first of the powerful geographic mapping program available is without a doubt DAZ Productions' Bryce software. Alas, power comes with a price. Bryce has a very steep learning curve, is not for the squeemish, and very few mappers in RPG circles have mastered it. Unfortunately, I am not one of them, although I have purchased the software and have tinkered with it enough to know first hand exactly how steep that curve actually is. Anna Meyer is one of the few online mappers who has mastered the program and has generated some truly amazing maps. She's now diving into the newest generation of geographic mappers. Visit her website at https://www.annabmeyer.com/. Anna and I have collaborated on a variety of projects, and continue to, and the Irongate geographic maps are some of the first finished products to come from that partnership. For these maps, Anna generated the original basemap from scratch using Bryce and exported a JPG. I then substantially modified the end result within Photoshop and finished up by adding labels, scale, and other details.
Bryce is a true 3-dimensional graphics package, with several different
types of editors that work together to create a true 3-D environment. A "map"
actually consists of many 3-D objects created in a separate editor (which uses
greyscale images as data-files) and then placed within another editor. Finished
Bryce maps may consist of hundreds of overlapping objects (each created separately)
and surfaces (such as water). Texture (image) files are then "mapped" over these
surfaces to provide color, texture, etc. onto the land surface. Lighting, camera
angle, and perspective are then defined, and a snapshot image exported from
Bryce for further modification in any other program you wish to use (such as
Photoshop). The results speak for themselves.
I'll end this section by talking briefly about PDFs. One does not create a map in a PDF-editing program, but you can present a map in PDF format as its final form. If all you have is a map image, you are better off keeping it as a GIF or JPG, as publishing it in PDF will likely increase the file size (sometimes quite significantly) if you wish to maintain a high final resolution. If, however, you want to include both text and map images in a single product (and keep the text as editable/copyable text readable by search engines, rather than as a rasterized "image" of text), than PDF is a good way to go. There are many programs that can convert various work files (images like .JPG or GIF, graphic files like .CDR or .AI, document files like .DOC or .DOCX) into PDF. However, since Adobe owns the PDF format, all of these programs will alway be a step behind Adobe Acrobat Professional. Of course, as I said about programs such as Photoshop and CorelDraw, you may not need the full functionality of the newest version, so an older version of Acrobat Professional or any of the alternate PDF-producing programs may serve you just fine. These programs generally work from within another program as an add-on or extension, and therefore are fairly simple to use unless you want to get fancy (see my discussion of layered PDFs below). From within Word, Illustrator, Photoshop, CorelDraw, or whatever, you select a "save as PDF" (most preferred), "export to PDF", or "print to PDF"(least preferred) command to produce your final PDF file. The preferences in command are a result of the type of output each command generates. The "save as PDF" command within something like Photoshop or Illustrator produces a PDF file that can be later edited easily in those programs (or Acrobat Pro). The "print to PDF" produces a file with fragmented text and graphical elements that is virtually impossible to edit in any sort of meaningful way.
Producing a map as a PDF will also allow you to do some special effects that may not be otherwise possible. One such effect is the creation of a layered map that allows different layers to be turned on and off. I've created one such map available on my Greyhawk's Underdark: A Regional Survey page, although you will have to click on the "Greyhawk's Underdark PDF" thumbnail in order to view the layered PDF. While viewing layered PDFs works best within newer versions of Adobe Acrobat Reader (remember, they do own the standard - turning off and on layers is often not possible in other PDF viewers), Acrobat Professional itself does not create layered PDFs on its own. To create a layered PDF, one creates the various layers you want to have as graphic images (with transparency) using your favorite image editing program, whether it is Photoshop, Gimp, CorelDraw, or whatever, and export those layers for assembly within a secondary program such as Adobe InDesign or an Acrobat Professional 3rd party plugin such as Aerialist by ARTS PDF. Using layers allows you to show a lot of information, whether it is location names, political boundaries, map symbols, or in the case of my underdark map, many different dungeon levels, without cluttering your map with a tremendous amount of overlapping material interfering with the clarity of your map. The steps you would go through for assembly vary with the programs that you are using.
So, how do I create a map?
First I draw a geographic outline by hand with pencil (always lots
of erasing) and paper, often by looking off a few real topographic maps
(although, rarily, I draw the entire map from within Photoshop). I then
scan the sketch, and import it into Photoshop as a working layer. Scan
at a high resolution because this is likely going to define your file
resolution (although you can change it manually). Some of my maps are
essentially hand-drawn and colored from within Photoshop (like my City of Melkot
local geography map), or have a hand-drawn background, with new
material added in Photoshop or CorelDraw (such as my Melkotia Castle
aerial view).
 |
 |
| Part of the hand-drawn (color) Melkot regional map,
scanned and color-enhanced in Photoshop. |
Part of the aerial view of Melkotia Castle.
Base map is hand-drawn, scanned, then colored in Photoshop. The castle
itself was then drawn all within Photoshop using a sketched
outline as a guide. Gradient fills give the roof areas a 3-dimensional
look. |
A few of my maps have been constructed completely within Photoshop, such as the Irongate maps (both sketch maps and final city map) and my current Maps of Mystery.
 |
 |
| The Marshland
Map of
Mystery, created within Photoshop, uses simple
contour-type banding to show water depth and a small area of cloned
symbols repeated over and over to show marsh and forests. |
Part of the Border
Bridge Map of
Mystery illustrates the use of Photoshop's "smudge" tool
on the colored contours of the valley, as well as on the river to give
the appearance of flowing water. The land areas then have a
semi-transparent granular layer overlain to give the flat regions
(fields and roads) texture. |
Many people make 2
huge mistakes when working in a rastor editor (like Photoshop,
Photopaint, PaintShopPro, etc.). They do not start out in a high enough
resolution, and they do everything in a single layer.
If you start out in a low resolution, then convert it to a high resolution, the best map will look terrible. Always map in a higher resolution then the highest you think you'll ever need. Hint: A high resolution map that doesn't look that good always looks better when you lower the resolution for final output. There is a trade-off however, and it is controlled by your hardware (CPU speed, harddrive size and speed, RAM memory space, and graphics card). The higher resolution you map at, the larger the file. At one point back in 1999 when I was creating my City of Greyhawk map (24 by 36 inches, at 450 dpi, and lots of layers) thePhotoshop saved file was over 170 MB. No problem you say? When Photoshop opened that file for editing, it generated a temporary work file (called a "scratch" file) that exceeded seven gigabytes in size. Now do you see the problem? With my (at the time) 333 MHz Pentium 2, it took 26 minutes to open or save the file (not to mention running out of space on my harddrive so that the file could not even be opened). I had to upgrade my computer twice while working on that map. The current file for my ongoing reworking of the City of Greyhawk is around 400 MB. Fortunately my current system is far more powerful than that old dinosaur.
And, use lots of layers. Layers on layers. Then add more layers!
Text (if it exists) always goes on the topmost layers. Any scan or
rough sketch that you're using as an outline usually goes on the bottom
layer. Sometimes, if I need to see the working scan all the time, I
make it partially transparent and move it up and down the stack (so I
can still see whats below it) or I make the fill layers (like the
ground coloring) transparent.
Create a new layer (above the scan layer) select "pencil" of appropriate thickness, and trace over the scan with your mouse (even better... with a graphics/digitizing tablet if you've got it!). Even just the mouse works pretty well if you work under high magnification. Hand jitters and imperfections disappear when you zoom back out (if you're working in a sufficiently high resolution in the first place, of course). I use separate layers for each class of construction (sometimes more then one layer). Topographic features should be your first working layers (above the scan). I like to have water and waterways at the bottom, then land above that (so a river is actually a hole in the land layer, looking down at the water fill). If you are drawing country- or continent-scale maps, where rivers are very thin, then they should go on a layer above and not below the land layer.
When drawing the topographic layers (land and water), you may want
to show elevation somehow. For this, I use a gradation of colors
(greens for forested areas, browns for land, blues for water), draw in
an edge for a color, and fill the inside with the paintbucket. Then I
use the next color, draw an edge, or "contour", and "fill" that. And so
on. I find it easier to start at low elevations and draw the next
higher elevation on top of that, and so on. Using lighter to darker
colors (or darker to lighter) gives an appearance of height. Play with
different shades and transitions to see what you like the best.
Eric Anondson, a true master at drawing topographic regional maps, says he uses brushes of decreasing size as he draws each color band of higher elevation. When drawing water he selects the open space, uses "Contract Selection" to create a new, smaller contour shape, then uses "Feather" to remove the hard edge, then "Fill". Repeat to make the next color (darker for deeper water), then again for the next, and so on. Use varying layer opacity if you wish to "fade in" a texture onto your land/forest areas. When Eric tries to simulate topography within the forest, he goes to the topography layer, uses the "Magic Wand" to select the elevation colors, "Feathers" the selection. Switches to the Forest layer, and alters the Contrast to lighten it. Switches back to Topography layer and "Deselect" then "Feather" lighter and lighter elevation layers, each time furthering the Contrast more to give the appearance of topographic change that is there.
Above the water and land topographic layers I place other layers for
mountain, tree and swamp symbols (if there are any). Then
roads/paved areas/courtyards above that. Next, a layer for features
like docks. Above that is the layer where I draw in buildings (although
I usually draw the city walls layer first). The top drawing layer(s) is
usually the city walls, gates and towers (so buildings appear flush
with the city walls and towers, because they actually extend beneath
them) and any other special features.
Above all of that goes all of the text layers. Never rasterize your text layers in your working file (unless you have too many layers for the program to handle... which has happened to me before). When I'm done, I squash ("flatten") them all together. Always save before flattening, and save your "squashed file" to a different file name, because most of the time you wiIl decide to go back and modify things again, something you cannot do once it is all flattened. Sometimes the original sketch (or more usually, an edited version of it) is still part of the final output (like parts of the City of Greyhawk and Melkotia Castle maps), however sometimes the original sketch has been completely replaced by drawn layers and is discarded during flattening.
For buildings, never use similarly sized and shaped squares and
rectangles to the exclusion of anything else. If you do, the city will
never look real or "organic" (a major problem with the object-based mappers - more on that
later). I've borrowed much of my city-style, as seen in both my City of Greyhawk and City of Irongate
maps, from
the excellent city
maps put out by Columbia Games for their HarnWorld campaign. I use the
"pen" function, assign vertices (which can be repositioned if
it doesn't start out perfectly square, and it rarely does) then
"stroke" the line black, delete the path, and add white fill. I have
even automated the line stroking (takes about 3 steps in Photoshop) by
scripting a single function key. In this way, literally any shape of
building can be quickly and easily created, and the uniformity of style
doesn't give your city a massively confused look that is overwelming to
the eye. You want to be able to see the layout of the city, and
location of streets and major features quickly and easily. If your map
scale is too small to draw in all of the individual building in a city,
then draw in city blocks, and use number labels to locate individual
buildings or features. Do not draw a few buildings, and leave the rest
of your city blank.
 |
 |
| A small portion of the City of Greyhawk map, created
by scanning a 2x3 ft hand-drawn base-map, and importing into Photoshop
for coloring and addition of buildings, city walls, and other features. |
A small portion of the City of Irongate map,
created
entirely within Photoshop, over top a greatly enlarged copy of the original Irongate sketch
map,
also created completely by doodling in Photoshop. |
 |
 |
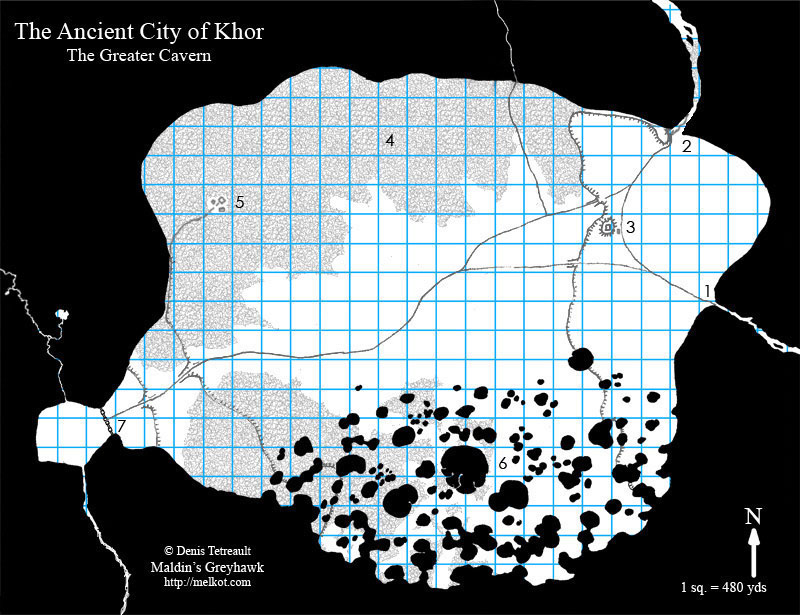
| An example of a city map, the Underdark City of Khor,
showing only city blocks, streets, and alleys, rather then individual buildings. City
sections, specific locations, and other features were then labelled
using different types of text tags. |
My map of Seltaren
is another example of a map showing city blocks and major streets. This
map was created for an Oerth
Journal article. The final version
for that product had a 3 dimensional effect (using Photoshop's beveling
function) to give it a special look. |
Mastering the mechanics of drawing does not, however, mean that now you can create wonderful maps. You must also understand the design of cities, an entirely different knowledge-base. This is where most object-based maps go seriously wrong. Purchasing Campaign Cartographer 3 (or the other similar programs) can help you get over the hump of (or bypass completely) learning the drawing mechanics, but you still have to have a good design or your map will look terrible.
Now, having said that... Any map that is close to one's heart, and is used to good effect for your own personal campaign, is fine if you say its fine. Period. End of discussion. Not everybody can, or even wants to, create publication-quality digital maps. My purpose in creating this webpage is not to discourage people from creating whatever maps they wish to create. My purpose here is to help people create better maps. As a hard critic of maps, having dealt with them professionally for over 40 years, having seen uncountable gamer maps on personal websites, and after looking through many hundreds of maps that have been uploaded to the websites of the various companies that make RPG mapping software, let me explain how 95% of all object-based mappers go wrong.
Mistake 1. Most object mappers start by drawing a big circle (or worse yet, a big square!) and label it "city walls". Sometimes there are sticky-outy-bits or flat spots, but they always look like added-on sticky-outy-bits or flat spots. Cities don't grow that way. Any old city grows in sections (of different sizes). Have the basic topography of the area in your mind. The most important piece of real estate will be the keep or castle (if there is one). It will occupy the most defensible parcel of land (or the place that best defends the region, such as a harbor choke-point, bridge, hill, etc.). Place that first. Next, consider where a city would first grow (for example, between the keep and the harbor) and you'll have your "old-city" quarter. Next, where is the prime real estate for view, safety and drainage? That is likely where the "noble" or "garden" quarter will be, because it is the nobles who have the money and power to "bulldoze" and rebuild any section of town that they want to live in. After that, think where the town's merchants are likely to settle, where the poor and criminal are likely to gather (voluntarily or not), and you'll know where those quarters should be placed. No city (at least, no medieval city) "appears" fully formed (despite what some published game-city histories may imply). It will grow over time, and the city's history will shape its geography.
Mistake 2. Scale is grossly underestimated. Even if a mapper completely fills the area inside his city walls solid with buildings, there rarely is enough buildings to harbor a tenth of the supposed population of the city. The buildings are usually drawn much too large for the scale of his/her city footprint. Even then, mappers rarely fill the space available (see Mistake 4). Population numbers should correspond somehow to the number of acres that a city covers. The ratio will vary, and that variance will characterize a city accordingly. Some cities are denser then others, and that will effect the "atmosphere" of the city.
Mistake 3. Object-based mappers usually design a city using the available objects - i.e. buildings. Real
cities are designed using streets.
This is why most object-based maps look like a cluster of unorganized buildings.
Because that is exactly what the mapper has drawn. Even within the
limited world of gaming, it is interesting that in literature penned by
their original designers, the cities of Greyhawk (by Gygax) and
Waterdeep (by Greenwood) are both described by their streets and
quarters, and many fantasy cartographers ignore these descriptions.
When I redrew the City of Greyhawk for Wizards of the Coast, I was
obligated to
preserve the general outline and locations found in previous
publications ("canon", namely the City of Greyhawk Boxed Set), and I
feel I did the best I could to "fix" the Free City given what I had to
work with, but I'd be the first person to say that the City of Greyhawk
really shouldn't have looked like that in the first place.
Also, this feeds back into the scale problem. Often streets are
drawn in at 1/10 the width of the city itself (or, if not drawn as an
actual "steet", the spaces between buildings become the "steets"). The
buildings are usually placed much too far apart. As stated above, if
you can't draw in all the buildings (which involves meticulous work at
a high magnification), stick to drawing city blocks (by drawing the
steet), and label individual locations on that.
Mistake 4. Object-based maps use prefab objects. In particular, the nice, square, separate buildings, spaced nicely apart like a parkland setting. To make it worse, mappers often don't even bother to rotate buildings out of the perfect N-S default orientation. Individually unique buildings can be drawn, although that program function is often not used. Just remember that, traditionally, the American Suburb is not what cities looked like. You don't get grassed yards in walled cities except perhaps for the absolute wealthiest, and even then, they'll be tiny, and walled off to keep the "unwashed" out of the gardens. Personally, I don't like using "roofed" or texture-filled buildings in my maps (hence the "millions of white squares" some people have dubbed my map style), simply because it clutters the map to the point where it becomes difficult to see the boundaries between individual buildings, and also makes it impossible to clearly label anything within the city. If you like the look of roofed or texture-filled buildings, then go with it. Roofed textures can usually be added to drawn building outlines.
While the nature of object-based mappers might foster the bad design principles described above
by encouraging shortcuts (and hence is reflected in the majority of maps being
done that can only be described as terrible), the problem is not with
the program's capabilities. The problem is bad design by the user, no matter
what program you decide to use. Bad design is not limited to amateur mappers, however. Some of the worst
maps I've ever seen were drawn by professional illustrators, and actually published
by TSR/Wizards of the Coast. Truly bad maps that come to mind include
those from WG8: Fate of Istus, maps of Sigil from the Planescape campaign (though some of those maps were drawn to show only a stylized "feel" and very generalized locations, and not meant to be used as a true street map),
and the village of Hommlet from the Return to the Temple of Elemental Evil.
And these are from the guys who should know better! Granted, the editors probably
got exactly what they asked for from the illustrators.
So how do you make your cities more realistic? Visit a medieval city, and walk around the back-streets. Many of you in Europe can walk out your front door and do this. You have a tremendous advantage over us North Americans (who often have seen nothing but urban sprawl). I've been fortunate enough to have visited several medieval-aged cities, and so I'll use some of my own photographs taken on those trips to illustrate the principles I'm talking about. For those of you who have never had such an experience, a search of the internet for photographs and maps of old cities can give you a good feel for how they are put together.
Most people build their campaign city backwards by drawing a city
wall, and then adding stuff inside. This is wrong from the start,
because real cities aren't built that way. First, sketch in
your roads (a layer that you can delete later because, in the end, much
of your roads will be defined by "space with lack of buildings"). Road
patterns follow the original (often curved or straightline) pathways
between incoming regional roads and major city features (e.g. city
squares, major temples, defensive or city government buildings, etc.),
and therefore
often meet at extreme angles. As can be seen in the aerial photograph
of Bologna, Italy, there are very few 90 degree angles when
major roads meet, although secondary streets may often meet those at
near-90 degrees. The city walls do not come first, they come
afterwards! Likewise the city gates did not determine major road
patterns... those roads were there first, and the gates built over them
when the wall was constructed.
 |
| Aerial photograph of the
medieval
city-center of
Bologna, Italy |
Superimposed over this pattern is another pattern determined by topography, particularly when building cities on sloped ground. In North America, most cities are built on flat land at the bottom of valleys (often along rivers), giving easy access to water sources and transportation routes. In medieval Europe many cities were built on the tops of hills, because city defense was the most important determining factor of location. The photograph of medieval Sienna, Italy, shows this quite nicely. Port cities (whether coastal or river) are an exception to this, although even they often chose locations with at least some high ground next to the harbor. Once you have your road pattern, shape the city walls around that, keeping it "real" to the topography. You'll never end up with a perfectly rectangular or circular (and fake-looking) city this way.
 |
 |
| The streets of Siena, Italy,
follow the topography, and not a grid pattern. Building shapes fit
whatever space is available. |
Old Siena is built on 3 adjacent hill
tops, the peak of each hill occupied by one each of the 3 most
important buildings in the city... the Citadel and the 2 major
cathedrals. This view is looking at one of the cathedrals from the
adjacent hill top next to the 2nd cathedral (the wall on the right). |
Then fill the city with buildings. And I don't mean scatter about
numerous square boxes all in a row. Fill the city with
buildings. City
walls were built for a reason... protection. To minimize the building
costs (which would be massive in any medieval economy), the wall will
tightly follow the dimensions of the city. Once the wall is build,
everybody (who could) wanted to be inside them. Therefore, unless the
wall has been built quite recently, virtually every square foot within
the wall will be utilized (and "city" will spill outside the walls
where the gates are). Most buildings (except for any "High" or "Garden"
quarter) will be right up against themselves, with no space whatsoever.
As such, buildings will fit the shape of the property, and may not
necessarily be square. This is quite evident in the above aerial
photograph
of the city center of Bologna, Italy, many of the existing buildings
dating back to the 14th and 15th century, its original layout dating
back even further.
Actually, there is a modern equivalent. You can look at a place like
Manhattan and see, at a different scale, how space is utilized. All of
a city block will be used, and buildings will be built up right against
each other. With the exception, of course, that Manhattan is a mostly
planned city. Medieval cities (except for Roman ones), didn't have nice
90 degree angled, perfectly square blocks. Rather, streets tend to
radiate out from the central square, which itself is encompassed by
major buildings (such as the City Hall and other government offices,
the manors of key families or merchant groups, guildhalls, etc.).
 |
| The central city square of Sienna, Italy,
during one of its festivals. City Hall is the far right building with
arches. |
Depending on the style of city layout you want, buildings may be
arranged around small courtyards that connect to streets, or large
buildings
may have interior courtyards (both evident in the aerial photo of
Bologna). Often courtyards will serve as the locations for wells. Not
all cities did this, however. The important thing to keep in mind is
that for much of the city, every square foot will be utilized. In fact,
some cities took extreme measures to maximize space usage within the
city walls.
Bologna, for example, mandated by its urban Statutes of 1249 and 1289 that all buildings must be constructed with "porticoes", or covered walkways (and ordered that they must conform to certain minimum dimensions, 9 feet in height, tall enough for a man on horseback). Over time these thus became quite extensive as new construction occured. Central (medieval) Bologna now has over 35 kilometers of porticoes. The cantilevered overhang was unique to medieval cities with expanding populations that began to add new stories when all space inside the city wall had already been utilized, and could get more square footage from the upper floors by essentially overhanging buildings into the street space. This style, known as "sporgenza", was particularly legislated against in most late medieval statutes (Rome's statutes of 1452, for example), as the construction was sometimes unsafe.
 |
| The "porticoes" of Bologna, Italy. The
archways visible on both sides of the road (behind the parked cars)
open onto the covered walkways as wide as the portion that can be seen
on the right side, and run down the entire length of both sides of the
street. |
With good design sense, even object-based mappers can be used to great effect,
especially for those people who either don't have the money, or the
drawing skill, to use Photoshop and/or CorelDraw. The Harn Mapping
Group is an excellent (and unfortunately rare) example of good (albeit
copied) design. I'm not sure how active they are lately, but they have
produced truly beautiful and, just as important, believable maps. Kudos
to you guys! You've done great work! For those of you willing to dive
into the more powerful graphics-editing programs, you will be limited
only by your imagination (and your patience).
Using Photoshop or PaintShopPro is like using a pencil. What you can produce is only limited by your imagination. But it is from "scratch". The mapping programs (which really are specialized CAD programs) automate some of the mapping by giving you specific tools and symbol sets, and therefore make it easier to produce maps that actually look like maps. But buying a program (any program) will not turn anyone into an expert mapmaker (and its worth saying again... not everyone WANTS to make expert maps anyways!). No matter what you decide to use, the output you'll get will depend on your creativity, skill, and experience. All of which will improve with each map you make.
So there you have it... "Maldin on Maps"(tm)
I hope you have found my musings helpful.

Visit my active site map to see the entire website
at-a-glance, find out whats new, and instantly jump there with just a
click.
Return to the Game Mechanics Page
Return to my main Greyhawk Page
(in case you got here through a search engine)
![]()
